A. The App
1. Introduction
1.0 The Reference Rhythm Method
TUPLET TRAINER is based on a simple method for learning Tuplets – The Reference Rhythm Method by Mulle Holmqvist.
The method is based on intuition and has been tested on and used by students for about two decades now – and it has proved to be extremely effective.
The trick is to use an understandable rhythm(a Reference Rhythm) and re-phrase it into a Tuplet.
Once you master the method, you’ll easily perform ANY Tuplet with full control thanks to the Reference Rhythm.
1.1 Overview of the App
To get the most out of the app, it’s recommended that you also watch the Video Tutorials.
The app has three pages. Main Page and Mixer Page in Portrait Mode, and Score Page in Landscape Mode.
You can operate the app in either Listen Mode or Practice Mode – regardless of which, you can always activate Info Mode.
In Listen Mode you can listen to the rhythms transforming from a Reference Rhythm into a Tuplet over a number of Steps that you select.
In Practice Mode you can practice the rhythms in different selectable Practice Configurations. You can use the Pads on the iPhone to practice if you like.
With the Quantization Controls, you set the starting point for the Reference Rhythm – and the end point for the Tuplet. With the Swing Factor Control, you add “swing feel” to the rhythm.
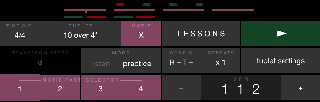
The app contains 28 tuples in 4 time signatures with altogether thousands of bar motifs.
The Mixer gives you total control of Channel and Master volumes. On the Mixer Page you also select different Sounds and Grooves and patterns for the Metronome.
On the Score Page there's the Notation of the selected Motif, by selection either as Reference Rhythm or Tuplet. There are also the Formula for Subgrouping of the Tuplet – a very important part of the method. The Subgrouping Formula is also described by Brackets below the Notation.
2. Statements
"Mulle Holmqvist has come up with something so simple, it defies intellectual reasoning, pertaining to rhythmic superimposition … with music it all comes down to hearing the results and applying them in real time performance. This app allows one to do that and truly interact with the patterns. The results could immediately affect an artist’s rhythmic concepts towards more freedom and sophistication… "
Dave Liebman,
Saxophonist/educator, served with Elvin Jones and Miles Davis before decades of leading his bands; recipient of NEA Masters of Jazz (USA); French Order of Arts and Letters among other awards.
“… Mulle has always been a few steps ahead of everyone else and everything he does is amazing stuff. If you are into music you realize that the cultural traditions are all coming together, the future is already happening as we speak, and Tuplet Trainer is one of the hippest things out there.”
Sten Hostfalt,
Jazz Guitarist, Bandleader and Educator New York City. Founder/Director NYC Guitar Studio, Faculty New York Jazz Academy
More statements about Tuplet Trainer and The Reference Rhythm Method on tupletmusic.com
3. Main Page (portrait mode)
3.0 Introduction
On the Main Page you can operate most of the functions in the app (all are found here except for the Notation and the Mixer functions) and this is probably where you will operate from most of the time.
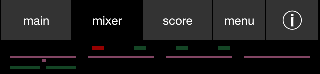
3.1 Page selectors, Menu, Info mode

(The selected tab is marked with black background color.)
 MAIN PAGE Selector
Tap to select Main Page.
 MIXER PAGE Selector
Tap to select Mixer Page.
 SCORE PAGE Selector
Tap to select Score Page.
 Menu
Menu
Tap to open the Main Menu. Tap again to select.
Here you will find:
- Settings/about
- Quick Start Guide
- Manual
- Video Tutorials
- tupletmusic.com
- Email support
(To get the most out of the app, it’s recommended that you watch the Video Tutorials.)
 Info Mode
Tap to activate. Tap again to exit Info Mode.
While in Info Mode you can tap any interface object for tool tips. Tap again to close the tool tip box and perform the normal function of the control. You can also tap directly on the tool tip box to close it.
As a default, Tuplet Trainer will always start in Info Mode, however this can be deactivated under 'menu' -> 'settings / about'.
3.2 Transport LEDs

3.2.1 Introduction
The Transport LEDs indicate:
Row 1. Time Signature – and current Beat in the bar when playing.
Row 2. The Length of the Motif – and current Bar in the Motif when playing.
(Row 1 and 2 are identical in LISTEN and PRACTICE Mode.)
Row 3 in LISTEN MODE: The Number of Steps selected to listen to the Reference Rhythm transforming into a Tuplet – and current Step when playing
(all LEDs in green).
Row 3 in PRACTICE MODE: Practice Configuration & the Number of Segment Repeats selected – and current Segment when playing (green & red LEDs).
3.2.2 Time Signature LEDs (row 1)

Indicate Time Signature – and current Beat in the bar when playing.
Three LEDs = 3/4, four LEDs = 4/4, five LEDs = 5/4 and seven LEDs = 7/4.
When in Play Mode, the LEDs light up one at a time – showing current beat in the bar. The first beat in the bar is indicated by red, the others by green.
3.2.3 Motif Length LEDs (row 2)

Indicate the Length of the Motif – and current Bar in the Motif when playing.
One LED indicates a 1-bar motif. Two LEDs indicate a 2-bar motif – and four LEDs a 4-bar motif.
In Play Mode, the current bar LED lights up.(The picture above shows a 4-bar motif with the third bar currently playing.)
The color of the selected motif (see 3.3.4 Motif Menu) also becomes the color of the Motif Length LED Indicators.
A dot below one of the LEDs indicates the Starting Bar in the selected Bar Motif Combination. Default is bar #1 of the motif, but variations can be set up (see 3.7.1 Motif Part Selector).
3.2.4 Transformation Steps LEDs
(row 3 in listen mode)

Indicate over how many Steps you have selected to listen to the Reference Rhythm transforming into a Tuplet – and current Step when playing.
If you select for example 8 steps with the Transformation Steps Selector, there will be 8 green LEDs indicating this – lighting up one at a time. LED #1 = step #1 etc.
(step #2 currently playing in the picture above)
(In Practice Mode, row 3 changes to Practice Configuration & Segment Repeats LED Indicators.)
3.2.5 Practice Configuration & Segment Repeats LEDs
(row 3 in practice mode)

Indicate Practice Configuration & the number of Segment Repeats selected – and current Segment when playing.
Green LEDs indicate bars to listen to. Red LEDs indicate gaps for you to fill in (by imitating what you just heard).
Current segment LED lights up when playing.(2nd segment currently playing in the picture above.)
See also
3.4.4 Practice Configuration Segment Repeats
(In Listen Mode, row 3 changes to Transformation Steps LED Indicators.)
3.3 Time Signature, Tuplet, Motif, Motif Menu, Play/Stop

3.3.1 Time Signature selector
 Time Signature Selector
Tap to open the Time Signature Menu. Tap again to select time signature.
(3/4, 4/4, 5/4 or 7/4)
Changing time signature updates the Tuplet Menu – each time signature has a different set of tuplets.
Also, the last tuplet you used for that time signature is selected automatically.
3.3.2 Tuplet Selector
 Tuplet Selector
Tap to open the Tuplet Menu. Tap again to select Tuplet.
There are four different sets of tuplets – one for each Time Signature.
Changing tuplet updates the motif menu, and automatically selects the last motif you used with that tuplet.
3.3.3 Motif Selector
 Motif Selector
Tap to open the Motif Menu – tap again to select Motif.
Each tuplet has its own set of motifs. If the motif is more than one bar long, a number in brackets indicates Bar Length. Different colors indicate different Categories.
(read more under 3.3.4 Motif Menu and 3.7.1 Motif Part Selector)
3.3.4 Motif Menu

The Motif Menu contains various lists of motifs depending on both the selected Time Signature and the selected Tuplet.
The picture shows the Motif List for 7 over 5.
Motif R is lit, indicating that it is selected. If the motif consists of more than one bar, there is a number in brackets to the right of the motif’s name. The number indicates the length of the motif – in this case four bars. The motifs can be one, two or four bars long.
The colors indicate categories of motif.
The categories are:
Row 1: GREY
1-bar motifs that reflect the Main Group (MG) and Subgroups 1 & 2 (SG1 & SG2)
Row 2: PURPLE
1-bar motifs based on two pitches (high and mid)
Row 3: TURQUOISE
1-bar motifs based on three pitches (high, mid and low)
Row 4: a MIX of purple and turquoise motifs
Row 5, 6 and 7 are motifs based on repetition of a melodic pattern. The motifs can be 1, 2 or 4 bars long.(h = high pitch, m = mid pitch and l = low pitch)
Row 5: YELLOW
Pattern: High – Mid (repeatedly)
P: ONE stroke on each (h, m etc.)
Q: TWO strokes on each (h-h, m-m etc.)
R: THREE strokes on each (h-h-h, m-m-m etc.)
Row 6: ORANGE
Pattern: High – Mid – Low (repeatedly)
S: ONE stroke on each (h, m, l etc.)
T: TWO strokes on each (h-h, m-m, l-l etc.)
U: THREE strokes on each (h-h-h, m-m-m, l-l-l etc.)
Row 6: PINK
Pattern: High – Mid – Low – Mid (repeatedly)
V: ONE stroke on each (h, m, l, m etc.)
W: TWO strokes on each (h-h, m-m, l-l, m-m etc.)
X: THREE strokes on each (h-h-h, m-m-m, l-l-l, m-m-m etc.)
The exercises P to X are very effective to get a deeper understanding of the Tuplet. More about this under 3.7.1 Motif Part Selector.
All menus contain MG, SG1, SG2 and A to X buttons. All Tuplets don't actually have all of those motifs – missing motifs are greyed out.
3.3.5 Play/Stop button
 Play/Stop Button
Tap to Play – the button changes to
Tap again to Stop – the button changes to
3.4 Transformation Steps, Listen/Practice Mode, Practice Configuration & Repeats
in Listen Mode

in Practice Mode

3.4.1 Transformation Steps
(listen mode only)
 Transformation Steps
Tap to open the Transformation Steps Menu.
A Step has the same length as the length of the selected motif – which can be 1, 2 or 4 bars.
The menu contains five choices: 1, 2, 4, 8 and 16 steps. Tap to select a number of steps to listen to the Reference Rhythm gradually transform into a Tuplet.
The selected Number of Steps is shown by the label on the Transformation Steps Selector button (and also indicated by the Steps LEDs).
The transformation start & end points are affected by the Quantization and Swing controls settings and the following example provides that the Reference Quantization (3.6.2) and Tuplet Quantization (3.6.3) are set to 0 and 100 respectively – and Swing Factor (3.6.5) is set to 0.
Example:
Selecting 8 steps results in the Reference Rhythm played exactly as notated in step #1. Then – from step #2 to step #7 – gradually transforming (evened out more and more), and in step #8 as a perfect tuplet (totally evened out).
When selecting 1 step, the Reference Quantization and Tuplet Quantization Controls disappear and are replaced by one control – the Motif Quantization Control (3.6.4) – that makes it possible to freeze the transformation process at a certain point.
3.4.2 Listen/Practice Mode selector
 Listen/Practice Mode button
Tap to switch between Listen Mode and Practice Mode (white letters indicate the selected mode).
In LISTEN MODE you can listen to the rhythms gradually transforming from a Reference Rhythm into a Tuplet over a number of Steps that you select (see 3.4.1 Transformation Steps).
In PRACTICE MODE you can practice the rhythms in different Practice Configurations(see 3.4.3 Practice Configuration).
3.4.3 Practice Configuration
(practice mode only)

Practice Configuration Selector
Tap to open the Menu.
There are four Configurations to choose from and the idea is for you to fill in the Blanks (empty bars) by imitating what you hear.
Tap again to select Practice Configuration.

One bar of the Reference Rhythm and one Blank.

One bar of the Tuplet and one Blank.

Reference Rhythm – Blank – Tuplet – Blank.

Reference Rhythm – Tuplet – Blank – Blank.
The Practice Configuration interacts with the Practice Configuration Repeats (3.4.4), making it possible to repeat the segments in the configuration.
Example: selecting R – T – together with x 2 will result in R R – – T T – –
3.4.4 Practice Configuration Repeats (practice mode only)
 Practice Configuration Repeats Selector
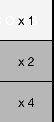 Tap to open the Menu. Tap again to select Number of Repeats (x1, x2 or x4).Example:
After having selected “R –” as Configuration, (set with the Practice Configuration Selector 3.4.3) “x 2” results in playing EACH SEGMENT in the practice configuration twice (i.e. R R – –).
3.5 BPM, Lessons

3.5.1 BPM

BPM Selector (Beats Per Minute). Here you adjust the tempo.
Tap to lower the tempo and to raise it by one BPM at a time. Press and hold to lower or raise by 10 BPMs at a time.
The label in the middle shows current tempo (BPM value). If altered, double-tap the label to reset to the default BPM for the current Tuplet.
3.5.2 Lessons
 After selecing Tuplet to practice on – tap the Lessons button to open the Lessons Window.
The Lessons, describing what to do and in what order, will help you understand and get into the method.
You can either select from the menu or flip through the pages with the arrows at the top.
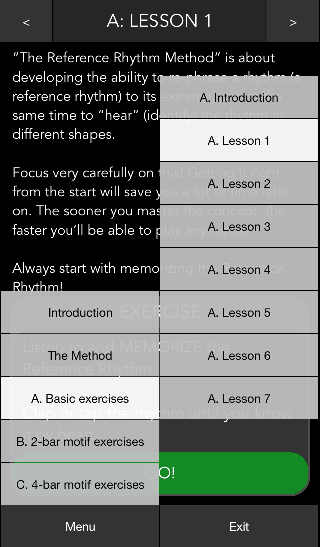
“A. Basic exercises” lesson 1 – 7 will take you through the basics of the method.
“B. 2-bar motif exercises” give advice on how to practice the 2-bar motifs.
“C. 4-bar motif exercises” give advice on how to practice the 4-bar motifs.
When you are ready, tap GO! to run the exercise.
TUPLET TRAINER keeps track on your last lesson for each tuplet.
3.6 Reference, Tuplet, and Motif Quantization. Swing Factor
3.6.1 Introduction
The Reference, Tuplet, and Motif Quantization, as well as the Swing Factor settings affect the shape of the rhythm.
In LISTEN MODE you set the shape of the Reference Rhythm (in step #1) with the Reference Quantization Control, and the shape of the Tuplet (in the last step) with the Tuplet Quantization Control.
In PRACTICE MODE this corresponds to what happens when selecting 2 steps in Listen Mode(i.e. the Reference Rhythm stays in the shape as defined with the Reference Quantization Control and the Tuplet as defined with the Tuplet Quantization Control all the time).
When selecting 1 step in LISTEN MODE the Reference Quantization and Tuplet Quantization Controls disappear and are replaced by the Motif Quantization Control. This mode makes it possible to freeze the transformation process. You simply listen to the rhythm with the degree of quantization you want for the moment – and for as long as you like.
3.6.2 Reference Quantization

The Reference Quantization Control sets the amount of quantization you want to apply to the selected Reference Rhythm - the higher the number, the more the reference rhythm resembles the target tuplet.
The Ref Q control is available in Practice Mode, and in Listen Mode when Transformation Steps is set to more than “1”.
In LISTEN MODE the Ref Q control (as well as the Tuplet Q control) interacts with the Transformation Steps Selector (3.4.1) in so far as ...
in Step #1 the transformation begins starting from the chosen Ref Q value and ends in the last Step at the chosen Tuplet Q value – gradually and proportionately transformed in relation to the number of Steps selected.
In PRACTICE MODE there's no transformation process. The Ref Q value is a fixed value.
Use the slider control to adjust the Ref Q.
Or tap or buttons to change value by 1 at a time, or press and hold the buttons to change by 5 at a time. (Range 0–50 %. 0 % = the Reference Rhythm exactly as notated.)
The label to the right shows current value. If altered, double-tap the label to switch to Default Value for the Reference Rhythm.
3.6.3 Tuplet Quantization

The Tuplet Quantization Control sets the amount of quantization you want to apply to the Tuplet.
In LISTEN MODE the Tuplet Q control interacts with the Transformation Steps selector (3.4.1) as described under 3.6.2 Ref Q.
In PRACTICE MODE there's no transformation process. The Tuplet Q value is a fixed value.
Use the slider control to adjust the Tuplet Q.
Or tap or buttons to change value by 1 at a time, or press and hold to change by 5 at a time. (Range 51–100 %. 100 % = the Tuplet exactly as notated.)
The label to the right shows current value. If altered, double-tap the label to switch to Default Value for the Tuplet.
3.6.4 Motif Quantization

The Motif Quantization Control (appears in LISTEN MODE only) sets the amount of quantization you want to apply to the Motif when listening in 1 step Mode. When set to “0” you will hear the perfect reference rhythm, when set to “100”, the perfect tuplet.
Use the slider control to adjust the Motif Q. Or tap or buttons to change value by 1 at a time, or press and hold to change by 5 at a time. (Range 0–100 %.)
The label to the right shows current value. If altered, double-tap the label to switch to Default Value for the Motif.
3.6.5 Swing Factor

With the Swing Factor Control you can add “Swing” (or “Triplet Feel”) to the selected Reference Rhythm.
Under certain conditions it also affects the Metronome and the Grooves. When a Tuplet with less beats than the total amount of 8th notes possible in the Time Signature is selected, the Metronome and the Groove will go along with the Swing Factor setting. Example: In 4/4 the Swing Factor will affect Metronome and Groove when selecting 5 or 7 over 4. But from 9 and up, the Swing Factor only affects the Reference Rhythm.
Use the slider control to adjust Swing Factor.
Or tap or buttons to change value by 1 at a time, or press and hold to change by 5 at a time. (Range 0–100 %, where 0 % has no effect on the rhythm)
The label to the right shows current value. If altered, double-tap the label to switch to default value.
Authors comment:
The straight Reference Rhythms tend to function better to start from when transforming to a Tuplet, but in two cases I've found it easier with swing feel (4 and 5 over 3), which is why they appear that way as default when selecting those.
“Swing feel” in real life doesn't always correspond to the result you get with the Swing Factor control. Human beings transform rhythms from straight to swing intuitively, not mathematically as in the app. Therefore, for two of the Tuplets (5 over 4, and 7 over 4) there are two alternatives. with straight feel and with swing feel as default. This way the rhythms correspond better to a “human” result.
3.7 Motif Part Selector, Tuplet Settings

3.7.1 Motif Part Selector
The Motif Part selector contains one button for each bar of the selected Motif.
When a 4-bar motif is selected, four buttons will appear (1- or 2-bar motifs give one or two buttons respectively).
Button #1 in the picture, is slightly bigger than the other, indicating that bar #1 is the STARTING BAR of the motif.
In Play Mode the buttons light up to show current bar playing (bar #3 currently playing in the picture).
Tap any button to select only that part (bar) of the Motif.
Tapping, for example, button #3 results in a selection of bar #3 only (the button becomes slightly bigger – and the rest in dark grey).

This way it's possible to play and practice bar #3 in the motif separately.
Pressing a button for 0.5-1 sec selects two bars in sequence, with the one you pressed as the starting bar.
Pressing button #3 for 0.5 sec gives this result.

Now you can practice bar #3 in combination with bar #4
or – when pressing button #4 for 0.5 sec,

practice bar #4 in combination with bar #1
(with bar #4 as the starting bar).
Pressing any of the four buttons longer than one second resets the motif to the full length.

Motifs P–X are built on repetition of a melodic pattern. The motifs can be one, two or four bars long.
These motifs/exercises are very effective to get a deeper understanding of the Tuplet.
If you can identify the Tuplet even when the melody shifts around, you've come a long way.
Sometimes, when the motifs have a Length of more than one bar, it may take some time to grasp them. If so, it's a good idea to split them up and practice one bar at a time and then successively put them back together.
A common problem is to keep orientation from one bar to another. Therefore, another good idea is to practice them in pairs.
The selectable set-ups for 4-bar motifs are:
1+2+3+4, 1+2, 2+3, 3+4, 4+1,
1, 2, 3, 4
The selectable set-ups for 2-bar motifs are: 1+2, 2+1, 1, 2
Another benefit with the part selecting is that you get a new bunch of good 1-bar exercises.
3.7.2 Tuplet Settings

Tap to open the Menu. Tap again to select.
Initially the menu contains two choices: “Default - straight” and “Default - swing”.
Changing the value of BPM, Ref Q, Tuplet Q, Motif Q, or Swing Factor will create a third choice in the menu for the current tuplet: “User setting”
You can switch back and forth between “Default – straight”, “Default – swing” and “User setting” in the menu without losing the stored “User setting”. However, manually changing BPM, Ref Q, Tuplet Q etc. back to the same values as “Default – straight” or “Default – swing” will erase “User setting” for the current tuplet.
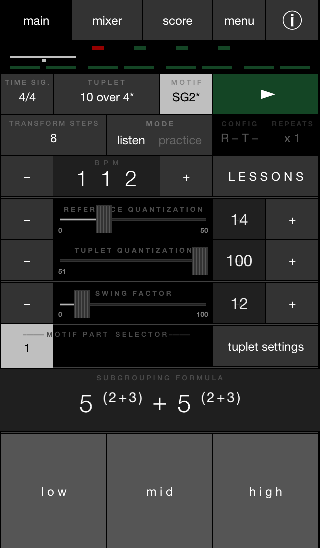
3.8 Subgrouping Formula

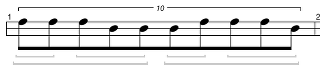
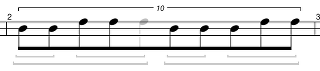
This is the Subgrouping Formula for 10 over 4.
The formula says:
The primary Main Formula is 5 + 5, and the 2nd Level Formula (a further subgrouping of the Main Formula) is 2+3 + 2+3.
Subgrouping makes it easier to perceive the Tuplet, and helps to guide you through it.
The more chunked up, the more control!
Subgrouping drastically increases control and is along with the use of an understandable rhythm (a Reference Rhythm), ONE OF THE TWO MAIN KEY CONCEPTS in the method!
The formula goes for the Tuplet (not the reference rhythm).
When playing a tuplet, it's extremely helpful to hear and feel it as consisting of different parts (subgroups) instead of a series of equivalent beats.
You should always keep the Formula in mind when playing the Tuplet. I.e. you should always feel the Tuplet as a specific combination of smaller parts.
Don't confuse subgrouping with the pitch variations in the different motifs.
ALWAYS STICK TO THE GIVEN FORMULA
– NO MATTER THE MELODY!!!
When you start to learn the method, don't think too much of the given Subgroup Formulas, just follow the steps under 6.3 Summary.
Read more under 7. Subgrouping
3.9 Pads

The best thing is to use your instrument for practicing, but in some situations it may be more convenient to use the Pads.
Tapping a Pad makes a sound from the Pad Instrument selected in the Pad Sound Menu on Mixer Page.
The Pads are active in both Listen Mode and Practice Mode and always ON – though affected by the Volume Settings in the Mixer.
4. Mixer Page (portrait mode)
4.0 Introduction
On the Mixer Page you make volume adjustments and select Sounds & Patterns for the Metronome and Groove channels.
Each channel has a volume fader (the vertical slider control) and an on/off button.
Also there is the Master Volume fader and the Reset button – resets all volume faders to default (75 %).
Some of the other features in the app – the “top row” buttons, the LED indicators and the Play button – are also available here (as well as on the other pages of the app).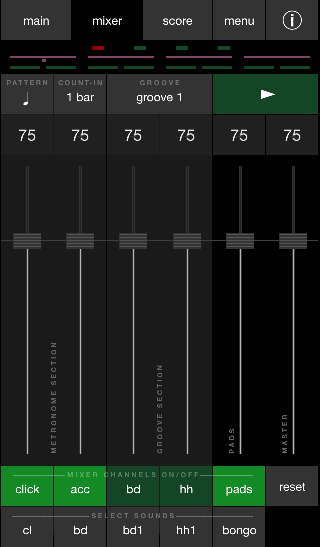
4.1 Top Row & Transport LEDs
4.2 Metronome, Count-In, Groove, Play/Stop

4.2.1 Metronome Pattern
 Metronome Click Pattern Selector
Tap to open the Menu.
 Quarter notes
(white background indicates selected)
 Eighth notes
accent on every other – starting on the first
 Syncopated quarter notes
starting on the second eighth note in the bar
 Eighth notes
accent on every other – starting on the second
(the latter two may be most useful in combination with the Groove patterns)
Tap to select a Click Pattern.
4.2.2 Count-In
 Count-In Selector
Tap to open the Menu.
(white background indicates selected)
 Count-In Menu
(metronome section)
0 bars = no count-in
1 bar = one bar of count-in
2 bars = two bars of count-in
Tap to select Count-in (how many bars that should play before the selected tuplet starts playing).
4.2.3 Groove Pattern
 Groove Pattern Selector
Tap to open the Menu.
(white background indicates selected)
 Groove 1: basic
hi hat + bass drum
(white background indicates selected)
 Groove 2: variation
hi hat + bass drum
Use the Groove Patterns to reinforce the feel of the Time Signature (turn on the Groove Section Mixer Channels).
4.2.4 Play/Stop Button

4.3 the Mixer
4.3.1 Volume Value Labels

On top of the vertical Volume Faders (4.3.2) are the Volume Value Labels – showing individual volume values for the different mixer channels.
If you raise or lower the volume, the values on the labels changes correspondingly.
If altered, double-tapping a label resets the volume to the default value (75 %).
4.3.2 Volume Sliders
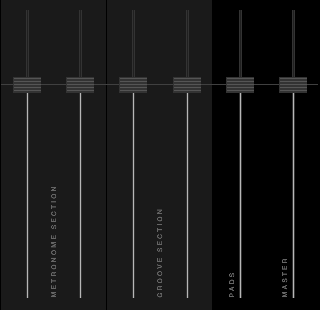
Adjust Volume individually for the sounds. Move the Sliders up or down to adjust.
From left:
Metronome section
– click
– accent
Groove section
– bass drum
– hi-hat
and rightmost
– pads
– master volume
If altered, double-tapping the value label on top of the slider resets the volume to the default value (75 %).
4.3.3 Mixer Channels On/Off, Reset Volume Faders

Tap to turn the Mixer Channels ON or OFF.
(lit green = ON, unlit green = OFF)
 Metronome Click Sound Channel
(metronome section)
 Accent Sound Channel
(metronome section) Accent = accent on the first beat of the bar
 Bass Drum Sound Channel
(grooves section)
 Hi-hat Sound Channel
(grooves section)
 Pads Sound Channel
Pads Sound = the sound of the Motif (Low, Mid & High Pads on the Main Page are always on)
 Tap Reset to reset ALL volume faders to the default values (75 %).
4.4 the Sound buttons & Menus

Tap a button to open a Menu.
(white background indicates selected)
Tap again to select.
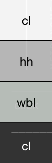 1. Click Sound Menu
(metronome section)
cl = claves
hh = hi-hat
wbl = woodblock
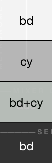 2. Accent Sound Menu
(metronome section)
bd = bass drum
cy = cymbal
bd+cym = bass drum + cymbal
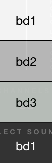 3. Bd Sound Menu
(groove section)
bd1 = bass drum 1 (short/fat)
bd2 = bass drum 2 (short/tight)
bd3 = bass drum 3 (un-muffled)
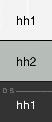 4. HH Sound Menu
(groove section)
hh1 = hi-hat 1 (soft/distant)
hh2 = hi-hat 2 (edgy/near)
 5. Pads Sound Menu
bongo = bongo drums
toms = toms from a drum set
5. Score Page (landscape mode)
5.0 Introduction
Turn the iPhone 90 degrees (to Landscape mode) to operate on the Score Page.
The Score Page has largely the same content as the Main Page.
The main difference is;
on the Main Page you have the Quantization and Swing Factor controls.
On the Score Page you have the Notation and the Subgroup Brackets (below the Notation).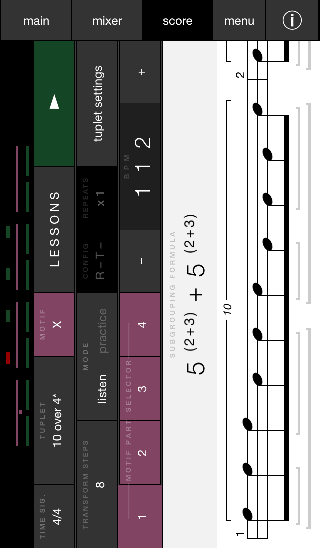
5.1 Top Section
In Listen Mode
In Practice Mode
See info under Main Page:
3.1 Page selectors, Menu, and Info mode
3.2 the LED Indicators (Transport LEDs)
3.3 Time Signature, Tuplet, Motif, Motif Menu, and Play/Stop
3.4 Transformation Steps, Listen/Practice mode, Practice Configuration, and Practice Configuration Repeats
3.5 BPM, lessons
3.7 Motif Part selector, Tuplet settings
5.2 Score Section
5.2.1 Subgrouping Formula

This is the Subgrouping Formula for 10 over 4.
The formula says:
The primary Main Formula is 5 + 5, and the 2nd Level Formula (a further subgrouping of the Main Formula) is 2+3 + 2+3.
Subgrouping makes it easier to perceive the Tuplet, and helps to guide you through it.
The more chunked up, the more control!
Subgrouping drastically increases control and is along with the use of an understandable rhythm (a Reference Rhythm), ONE OF THE TWO MAIN KEY CONCEPTS in the method!
The formula goes for the Tuplet (not the reference rhythm).
When playing a tuplet, it's extremely helpful to hear and feel it as consisting of different parts (subgroups) instead of a series of equivalent beats.
You should always keep the Formula in mind when playing the Tuplet. I.e. you should always feel the Tuplet as a specific combination of smaller parts.
Don't confuse subgrouping with the pitch variations in the different motifs.
ALWAYS STICK TO THE GIVEN FORMULA
– NO MATTER THE MELODY!!!
When you start to learn the method, don't think too much of the given Subgroup Formulas, just follow the steps under 6.3 Summary.
Read more under 7. Subgrouping
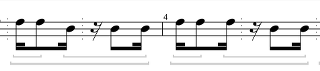
5.2.2 Notation
Thin (dotted) grid lines divide the Notation in Quarter Note Areas. This can be turned off under “menu” –> “Show notation grid lines” .
Immediately after the bar line is a small digit indicating the Bar Number.
Tap in the UPPER HALF of the notation to switch between showing the motif as a Reference Rhythm or Tuplet.
If the motif consists of more than one bar, the notation scrolls to the relevant bar automatically when Tuplet Trainer is playing.
In Stop mode you can use the Motif Part Selector to switch between the different Bar Motifs, or scroll manually in the LOWER HALF of the Notation.
In Play mode the note currently playing “flashes” (turns to grey).
The Brackets below the Notation describe the Subgrouping Formula.
The bottom brackets:
the Main formula (the large numbers in Subgrouping Formula above the motif).
The top brackets:
the 2nd Level Formula (the smaller numbers in parentheses in the Subgrouping Formula).

B. The Method
6. The Reference Rhythm Method
6.0 Introduction
“Straight into the subconscious – past the conscious. That’s how I would describe Mulle Holmqvist’s reference rhythm method. The conscious mind of decision making, analyzing, thinking and reasoning, is an instrument far too blunt and slow to work in a creative process. The subconscious (the base of our emotions) instead works on an intuitive level, i.e. you can ‘feel‘ when something is right. An inner knowledge greater than words or logical explanation. Mulle’s reference rhythm method works as a magic key, opening the door to the subconscious, allowing you to enter a polyrhythmic world where seemingly ‘impossible‘ rhythms are performed with natural ease.”
Helge Albin,
Professor Emeritus of Jazz Improvisation
Tuplet TRAINER is based on a simple method for learning Tuplets – THE REFERENCE RHYTHM METHOD by Mulle Holmqvist.
It's been tested on and used by students for more than two decades now, and it has proved to be extremely effective.
The method is based on intuition and the trick is to use an understandable rhythm (a Reference Rhythm) in order to reach a Tuplet.
After memorizing the Reference Rhythm, consisting of the number of beats you want to play, you gradually re-phrase it until you reach the Tuplet.
Once you master the method, you will easily perform ANY Tuplet with FULL CONTROL thanks to the Reference Rhythm.
6.1 How It Works
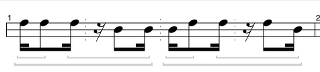
Let's say you want to practice 10 over 4. Here's the Reference Rhythm:
Clap or tap the rhythm. When you have memorized it, you slowly start re-phrasing it.
Loosen up the rhythm. Make it “smoother”. Let the hand relax and don't strive to be exact, let the rhythm be inaccurate. Let the spaces between the beats gradually shorten or stretch out, depending on what you need to make them add up.
Keep the Reference Rhythm in mind ALL THE TIME!!!
And for the time being, consider all results (including the “perfect” Tuplet) as variations of the Reference Rhythm
(One trick is to tap the rhythm while raising the tempo gradually. At a certain point, you'll start to smooth out the edges – and eventually even out the gaps between the notes.)
Practice like this for a while and get acquainted with the concept this far. And when you feel comfortable with that …
What you need to do now is find the courage to “Fly Freely” between the downbeats.
When you play eighth notes over four beats, every other note is simultaneous with the beats of the bar. With most Tuplets, there's only one simultaneous beat. But don't worry, the Reference Rhythm will guide you and keep you in control. Just remember to keep it in mind all the time – this is absolutely crucial!
Take your time, trust your instinct, and just let it happen. Focus on the tempo and the time signature, and let your subconscious mind sort the rhythm out for you. Let the spaces between the beats change as you go and don't worry if it's not “perfect”.
For as long as you need to, it's better to play an elastic rhythm WITH CONTROL than an even rhythm without control.
Subgrouping the Tuplet will drastically facilitate the understanding and learning of the Tuplet. Subgrouping makes it easier to perceive the Tuplet, and helps you find your way through it. It also provides a musical character and a good starting-point for phrasing.
Initially, though, you shouldn’t worry too much about subgrouping.
By using a Reference Rhythm that melodically reflects the subgroups (as in the picture above) you get them “for free” anyway. Later on, when playing motifs that don’t reflect the subgroups it’s extremely helpful to feel the Tuplet as consisting of different parts (subgroups) instead of a series of equivalent beats.
Read more about subgrouping under
7. Subgrouping.
6.2 Simulating the Re-Phrasing Process with the App
In LISTEN-MODE you can simulate the re-phrasing process and listen to the rhythm transforming from a Reference Rhythm into a Tuplet over
Or choose , alternating directly between the Reference Rhythm and the Tuplet.
(In the beginning of the learning process you might find it hard to go along with the transformation all the way. If so, try setting the Tuplet Q to a lower value, say 50–60 %, where you can still hear the Reference Rhythm quite clearly.)
By selecting , you can freeze the transformation at a certain point, set by the Motif Quantization Control, and listen to the motif with desired degree of quantization for as long as you like.
6.3 Summary
Carefully follow the few but very crucial instructions, and you'll be able to master the method very quickly.
* Memorize the Reference Rhythm.
* Get the feel of the tempo and the time signature and start re-phrasing.
* Trust your instinct and let your subconscious mind sort the rhythm out for you. Intuitively you “just know”.
* Keep the Reference Rhythm in mind all the time!!!
The second you let go of it, you'll most likely lose control.
The Reference Rhythm is your KEY, your GUIDE and your SAFETY NET.
To begin with, consider ALL RESULTS – including the perfect Tuplet – as variations of the Reference Rhythm.
DON'T start intellectualizing or try to anticipate the result. This will only delay the goal. A common mistake is trying to hear if the destination rhythm (the Tuplet) is “correct” (perfectly evened out). As a rule, this leads to lost control and failure. So don't worry if the Tuplet is not perfect – it will be when you're ready for it.
For as long as you need to, it's better to play an elastic rhythm WITH CONTROL than an even rhythm without control.
6.4 About Phrasing (and Timing)
Your phrasing is always related to something. For example, you can play with straight or triplet feel, or you can express yourself through different ideals – conventional or personal. Therefore we all have somewhat different ways of expressing rhythms.
This includes Tuplets, which is important to remember so that we don't get stuck in a misdirected ambition to play them “correctly”.
7. Subgrouping
7.0 Subgroup
A Subgroup is a part that together with other parts (subgroups) form the Tuplet.
Compare with words that form a sentence.
THEUSEOFSPACESDRASTICALLYFACILITA
TESREADING.
The use of spaces drastically facilitates reading, and the use of subgroups drastically facilitates the ability to perceive the Tuplet.
It’s extremely helpful to feel the Tuplet as consisting of different parts instead of a series of equivalent beats.
Initially you shouldn’t worry too much about subgrouping. When you practice the default motifs (“SG2”) that melodically reflect the subgroups, the Subgrouping Formula will find it’s way into your system anyway, without you noticing.
But when you’ve come a bit further and want to be “free” and able to play all kinds of motifs with different melodic structures, you should always feel the Tuplet as a specific combination of smaller parts (i.e. the Subgrouping Formula).
The given Subgrouping Formulas in the app are the groupings the author usually feels when playing. You may find other groupings that suit you better, but the given ones are recommended to start out with. The formulas sometimes change while playing, and there are a lot of possibilities.
Here’s an example with 12 over 7:
12 over 7 mainly feels like 7 (3+4) + 5 (3+2) over 7.
7 and 5 generally stays put but may sometimes change – for example to 6 + 6.
More often, the changes occur within the brackets: (3+4) switches to (4+3) and (3+2) to (2+3).
Furthermore, 3 can start as 1+2 but may change to 2+1 and 4 can be 2+2 changing to 1+3 or 3+1 and so on.
The above is mentioned because of the importance of being aware of the Subgrouping Phenomenon and its nature. And also to say that it’s normal with variations occurring in the “Inner Formula”.
Confusing? Not at all! Don’t worry about it. Don’t even think about it. But hopefully now you won’t be surprised when the day comes …
7.1 The Importance of Subgrouping
Subgrouping increases control and is along with the use of an understandable rhythm (a Reference Rhythm) ONE OF THE TWO MAIN KEYS in the Reference Rhythm Method.
When playing a Tuplet, it's extremely helpful to hear and feel it as consisting of different parts (Subgroups) that you put together. The more chunked up – the more control!
Subgrouping makes it easier to perceive the Tuplet, and helps to guide you through it. It also provides a musical character and a good starting-point for phrasing.
"By using two well-established principles in human learning, the Reference Rhythm Method makes you expand your rhythmic vocabulary almost without you noticing.
The first principle is to use what is already mastered to learn the new.
The other principle is chunking, which is a way to group items into subunits and patterns to facilitate understanding and thereby learning. I am really impressed by how basic psychological learning principles are harnessed in ‘the Reference Rhythm Method’."
Mats Lekander,
professor of psychology, and also a double-bass player.
7.2 The Subgrouping Formula
The given Subgrouping Formulas are based on the groupings that the author usually feels when playing. You may find other groupings that suit you better, but the given ones are recommended to start out with.
On Score Page the subgrouping formulas are also marked by Brackets below the notes in the Image of the Motif. It’s a good idea to watch the notation and the brackets when listening to the motifs. Preferably use Tuplet view.
N.B.! The Subgrouping Formula goes for the Tuplet – not the Reference Rhythm!
7.3 Author's Comment
The subgrouping is not the result of a conscious decision – it happens spontaneously. After realizing that, I started analyzing the phenomenon, resulting in the given formulas.
Initially, when you start to learn the method, just follow the steps under 6.3 Summary – don't think too much of the given Subgrouping Formulas. You will probably feel the tendency of subgroups anyway and if so, take note of the occurrence but don't start analyzing yet.
Don't confuse subgrouping with the pitch variations in different motifs. Stick to the given formula no matter the tonal structure.
When listening to the motifs, it could be a good idea to count the formulas out loud until you can really feel them.
And this goes for Subgrouping as well as for the Reference Rhythm Method as a whole;
after planting the necessary keys – don't try too hard! The intention could very likely become an obstacle.
Trust your subconscious and just let it happen! Intuitively you “just know”. You’ll be amazed by what you can achieve by intuition – only you have the right keys!
8. Practicing Tips
8.1 Always Start With
Always start with practicing the Reference Rhythm until you master it and know it by heart. Don't forget to try the Reference Rhythm in Straight Feel as well as in Triplet Feel.
Always start with the default motif (SG2), which reflects the subgroups of the chosen Tuplet.
When you start re-phrasing the Reference Rhythm – try different tempos. A slow tempo is revealing, and therefore useful. But often it is easier to begin with a fast tempo.
8.2 Then
When you have come a bit further – notice the subgroups and KEEP THEM IN MIND (as they are written) NO MATTER THE STRUCTURE OF PITCHES in the different motifs.
P – X are 1-, 2- or 4-bar motifs built on repetition of different melodic patterns. These exercises are very effective to get a deeper understanding of the Tuplet.
If you can identify the Tuplet even when the melody shifts around, you've come a long way.
One way of simplifying – but also expanding – the exercises with 2- and 4-bar motifs, is to split them up and practice one or two bars at a time and then successively put the exercise back together.
Use the Motif Part Selector to choose which bar or combination of bars you want to practice on.
8.3 Comment
Since the central purpose of the app is to facilitate the learning of Tuplets, it is focused on effective exercises that lead to understanding as quickly as possible.
To keep it simple, the exercises contain only two or three pitches. The exercises are not targeted at any specific instrument and the notes in the exercises are not meant to be read as specific notes. Instead they represent three unspecified pitches: high, middle and low.
Good luck with the exercises!
C. More Info
14. Tuplet Trainer
Concept: Mulle Holmqvist
mulleholmqvist.se
Programming: Fredrik Arsœus Nauckhoff
www.fredrik.....
Video Tutorials and more on
Tupletmusic.com
15. The Reference Rhythm Method – The Book
Said about the book:
"Mulle Holmqvist has come up with something so simple, it defies intellectual reasoning, pertaining to rhythmic superimposition. This has to be one of the most practical books ever written ready for immediate usage by any curious musician.”
Dave Liebman,
Saxophonist/educator, served with Elvin Jones and Miles Davis before decades of leading his bands; recipient of NEA Masters of Jazz (USA); French Order of Arts and Letters among other awards
The book can be purchased on mulleholmqvist.se
Tap content headings above to open/close content sections.